Build the Sim-Lab GT1 Evo Without the Rework
The question
sim lab gt1 evo build
Assemble the GT1 Evo frame first, then fit the seat, pedals and wheel before final tightening; match the manual to your kit.
Build the Sim-Lab GT1 Evo in this order: base and feet, seat support profiles, wheel uprights and deck, pedal deck, then the accessory arm. Secure the structure before sitting in it, but finish the driving-position adjustments before attaching your monitor and securing cables.
Building from the box: match the manual first
Start at Sim-Lab’s downloads page. It lists separate instructions for the standard GT1 Evo, the rig bundle and the front mount. Match the document to the hardware you received; a bundle name does not guarantee the standard assembly diagrams apply throughout.
The standard manual checked for this guide is version 3.3, dated 2 June 2026. It specifies 5 mm and 6 mm hex keys, a 13 mm wrench and a flathead screwdriver. Its parts list starts on page 22. GT1 Evo assembly manual
Lay the profiles on a protective surface and separate the fasteners before starting. For bolts that look almost identical, use Sim-Lab’s hardware identification sheet: print it at 100% scale and compare the hardware against the drawings. Check the printed scale before trusting it; a printer’s fit-to-page setting defeats the comparison.
Work through the assembly in manageable stages:
- Assemble the base on a flat surface. Start every fastener by hand. Before tightening the rectangle, measure between opposite corners in both directions. Equal diagonals provide a useful check against assembling a skewed frame.
- Fit the feet and seat support profiles. Keep access to the underside clear. Choose the seat mounting arrangement before fixing its support spacing.
- Install the wheel uprights and crossmember. Measure both sides from the same reference point on the base. A matching measurement is easier to reproduce than a visual estimate.
- Attach the wheel deck and pedal assembly. Support each assembly while adjusting it; do not let its weight hang from a partially engaged fastener.
- Position the accessory arm. Check that it leaves room for the seat, your leg and entry into the cockpit.
Use the manual’s fastener callouts at each stage. Two bolts sharing a thread diameter are not necessarily interchangeable: length, head shape and the washer stack affect whether a joint clamps correctly.
Two details prevent unnecessary dismantling. The supplied slot nuts can be inserted through the profile slot, and bracket tabs should be removed only where the manual marks that operation. Do not remove every tab pre-emptively. Slot-nut and bracket instructions
For scheduling, reserve an afternoon and leave time for adjustment. Ben Gray’s older GT1 Evo build at ADAPT Network took the majority of an afternoon, with extra time advised for a first profile cockpit. That is a reviewer’s build estimate, not a timed result for today’s kit. ADAPT Network’s GT1 Evo review
Choosing the seat and tools before buying extras
The seat deserves attention before the monitor or shifter. Check both how it attaches and whether its shell fits your body. A bottom-mounted seat and a bucket seat with side mounting holes require different mounting arrangements; a slider does not automatically adapt one to the other.
There is a useful independent measurement here: ADAPT Network’s Ben Gray measured the regular SPEED1 seat at 33 cm across its narrowest point in his 2020 review. That measurement belongs to the seat he reviewed, not every current Sim-Lab seat. It illustrates why the outer width and a product photograph cannot establish whether you will fit comfortably. Gray’s seat measurements
For the Sparco slider arrangement covered by Sim-Lab’s separate instructions, the rails attach to the frame, the handle is adjusted to their spacing, and moving the sliders exposes the bracket fastening holes. Follow that document’s bolt positions rather than trying to assemble the whole stack with the rails locked in one position. Sim-Lab seat-slider instructions
Just want the recommendation?
Skip to the picksBefore loading the seat, confirm that both rails lock. If the slider binds, inspect whether the rails are parallel and the release handle operates both sides. Forcing the seat back and forth can hide an alignment problem without solving it.
For tools, consider the Wera 950/9 Hex-Plus Multicolour 1 SB, part 05073593001, if you lack a suitable metric set. Its colour coding helps distinguish sizes, and the long-arm ball ends provide angled access. The drawback is that it remains a manual L-key set and does not include the wrench or screwdriver needed elsewhere in the build. Existing, correctly fitting metric keys are sufficient. Wera’s tool specifications
There is no evidence-backed product to label “skip” for this assembly. Buy missing tools or mounting parts only after checking the box contents.
An especially relevant correction to older advice: version 3.3 lists 24 M6 washers as extras, whereas ADAPT’s older review reported their absence. Do not order a washer assortment solely because an old build guide says they are missing. Current hardware inventory
Getting the driving position right before the first lap
With the seat securely installed, adjust pedal reach first. You should be able to apply your intended braking pressure while keeping your back supported, without reaching with your toes or straightening your leg completely. Then adjust the wheel’s distance, height and angle. These are fitting checks, not universal measurements: seat shape, pedal travel and steering-wheel diameter change the result.
Make one adjustment at a time. Record the starting positions with removable tape so you can reverse a change that makes things worse. Support the wheelbase before loosening its deck; a heavy base makes an otherwise simple adjustment awkward.
Check the mounting instructions supplied with your exact wheelbase and pedals before selecting bolts. A matching hole pattern establishes alignment, but it does not establish allowable bolt penetration into the device. Do not assume the cockpit’s leftover hardware has the right length for every peripheral.
Before powering the wheelbase:
- Check the frame joints and every seat attachment systematically.
- Confirm that the slider locks and the pedal deck stays in position under braking pressure.
- Turn the wheel through its usable range and check knee clearance.
- Move the seat through its adjustment range and check cable slack.
- Keep wiring clear of slider mechanisms, moving pedals and clamping surfaces.
If something moves, identify the moving joint before buying reinforcement. Observe whether the motion comes from the seat rails, a bracket connection, the deck or the peripheral itself. Those are different problems and need different fixes. No quantitative independent frame-deflection test was located for the current version, so a universal “zero flex” or maximum-torque claim would overstate the evidence.
Position the monitor after the seat and controls are settled. If a super-ultrawide is part of the build, the OLED G9 sim-racing guide covers that separate display decision.
If a supplied part cannot match the correct diagram, stop at that connection and contact Sim-Lab support with the manual version, part reference and photographs. Do not drill or modify it merely to make an unexplained mismatch disappear.
The bottom line
What you need for this:
Top pick
It depends
Wera 950/9 Hex-Plus Multicolour 1 SB 05073593001
The set includes the required 5 mm and 6 mm hex sizes, but adds no necessary capability if you already own suitable metric keys.
Useful if you need metric hex keys for assembling and adjusting the GT1 Evo. The manual L-key set does not include the required 13 mm wrench or flathead screwdriver.Available at Amazon(paid link) — opens Amazon in a new tab. Price and availability shown there.
Recommended products
Ordered by how well each one fits the situations above. Each link below is a paid link.
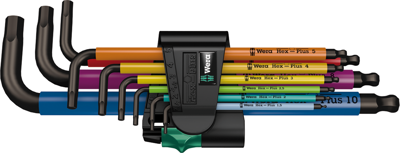
Wera 950/9 Hex-Plus Multicolour 1 SB 05073593001
Consider — The set includes the required 5 mm and 6 mm hex sizes, but adds no necessary capability if you already own suitable metric keys.
Useful if you need metric hex keys for assembling and adjusting the GT1 Evo. The manual L-key set does not include the required 13 mm wrench or flathead screwdriver.Available at Amazon(paid link) — opens Amazon in a new tab. Price and availability shown there.
Sources
Pages consulted while researching this article. None of these are affiliate links.
- Sim-Lab downloads and assembly manuals — sim-lab.eu
- Sim-Lab GT1 Evo instruction manual, version 3.3 — cdn.shopify.com
- Sim-Lab frequently used hardware identification sheet — cdn.shopify.com
- ADAPT Network: Sim-Lab GT1 Evo cockpit review — adaptnetwork.com
- Sim-Lab seat-slider assembly instructions — cdn.shopify.com
- Wera 950/9 Hex-Plus Multicolour 1 SB specifications — wera.de